Introduction: This is a very basic and simple level app user interface template that can be used on your VPN project. This is completely free and you can download it from GitHub.
If you face an issue: “Flutter Member not found: FirebaseAppPlatform.verifyExtends” you are in the right place. We will solve how to fix the Flutter Member not found: FirebaseAppPlatform.verifyExtends issues. The following things we will discuss in this article:
Why does the Error happen?
What does the Error look like?
How to solve this error?
Why does the “Flutter Member not found: FirebaseAppPlatform.verifyExtends”error happen?
This error happens if you update the flutter plugins and you have used the firebase on your project. It has no obvious reason to show this error. When you face this error, don’t be afraid, it can be solved very easyily.
What does the Error look like?
The error looks like below:
../../flutter/.pub-cache/hosted/pub.dartlang.org/firebase_core-1.24.0/lib/src/firebase_app.dart:18:25:Error:Member not found:'FirebaseAppPlatform.verifyExtends'.FirebaseAppPlatform.verifyExtends(_delegate);^^^^^^^^^^^^^FAILURE:Build failed with an exception.
This is what the error looks like.
How to solve this error
To solve this error, just add the below code under the dependency on pubspec.yaml file.
This article dives deep into how to show Flutter toast message.
The Flutter Toast message is a brief message that typically appears at the bottom of the screen and automatically vanishes after the allotted amount of time. Users are informed of the action they have taken using it. You can enhance the app’s user experience by including Flutter Toast message in your application. We will therefore discover how to display Flutter toast message in this tutorial.
Even a small notification is sufficient for us to feel secure while using an iOS or Android app to send messages, make payments, etc. These notifications simply appear and fade away without obstructing the view; they don’t interfere with your navigation.
We will learn about flutter toast notifications in today’s post and how to use flutter toast message to create a toast notification.
Table of Contents
So let’s get going!
The Need for Flutter Toast Message
Users may occasionally be unaware of the action they have taken for a variety of reasons, including poor UI design. For instance, a customized button (without a ripple effect) might leave users wondering if they actually clicked a button. By displaying a message that acknowledges the user’s action, a Flutter Toast message enables you to enhance the user experience of your app as a whole.
TLDR: It’s always a good idea to inform users of any significant actions they have taken, such as making a payment or deleting any important data.
What does a Flutter Toast Message mean?
A flutter toast message is a non-clickable, unobtrusive, auto-expiring component used in the app to display brief information quickly. It appears briefly before going away in the iOS or Android app.
The Flutter toast message is primarily used by developers to provide feedback on user actions. One of the key elements in mobile applications that increase the app’s interactivity is a toast notification.
Because there is no dedicated widget or function for displaying a toast message in Flutter, you must add a Flutter Toast message dependency to the project in order to create a toast notification in the Flutter app. Toast’s flexible position is not shared by the snack bar widget that is used in its place.
Let’s learn more about toast notification creation in the Flutter application in depth.
How to Display Toast in Flutter
There are primarily two ways to display Toast in Flutter:
Utilizing SnackBar
Utilizing the fluttertoast Plugin
Any of those as mentioned above can be used, depending on your needs.
Installation
Run the following command to utilize the package.
flutter pub add fluttertoast
To your pubspec.yaml file, this will add the line below.
dependencies:fluttertoast:^8.0.9
Use the following Dart code to import it:
import 'package:fluttertoast/fluttertoast.dart';
Additionally, you can employ the dependency inside by:
Fluttertoast.showToast(msg:"Hello!");
Several characteristics of Flutter toast:
toastLength: Time for the toast message
backgroundColor: The background color that will be displayed
textColor: The text color that will be displayed
fontSize: Toast Message font size
gravity: Toast message location
msg: Toast message
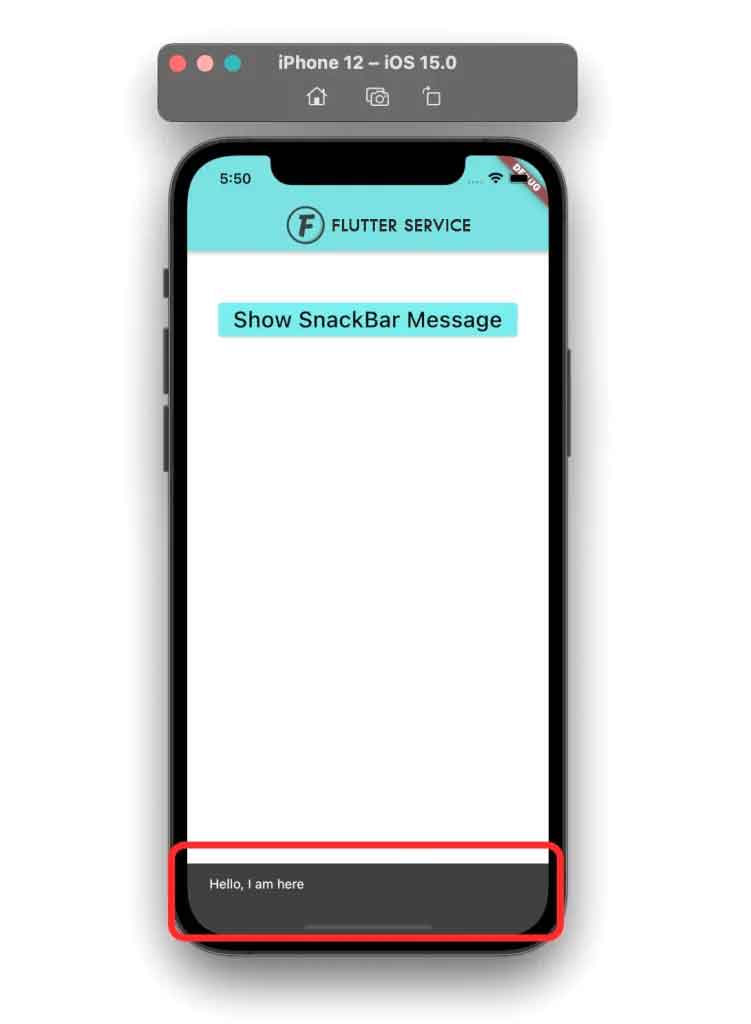
Utilizing SnackBar
Use the SnackBar in Flutter to display a toast. In accordance with the Material Design recommendations, the SnackBar is the proper/official way to display toast.
Using snackbar, demonstrate toast:
If you haven’t already, add the button (ElevatedButton) in step one.
Creating a SnackBar inside a button’s onPressed method is step two.
Adding the ScaffoldMessenger, calling the showSnackBar method, and passing the SnackBar you previously created are all done in the next line of code.
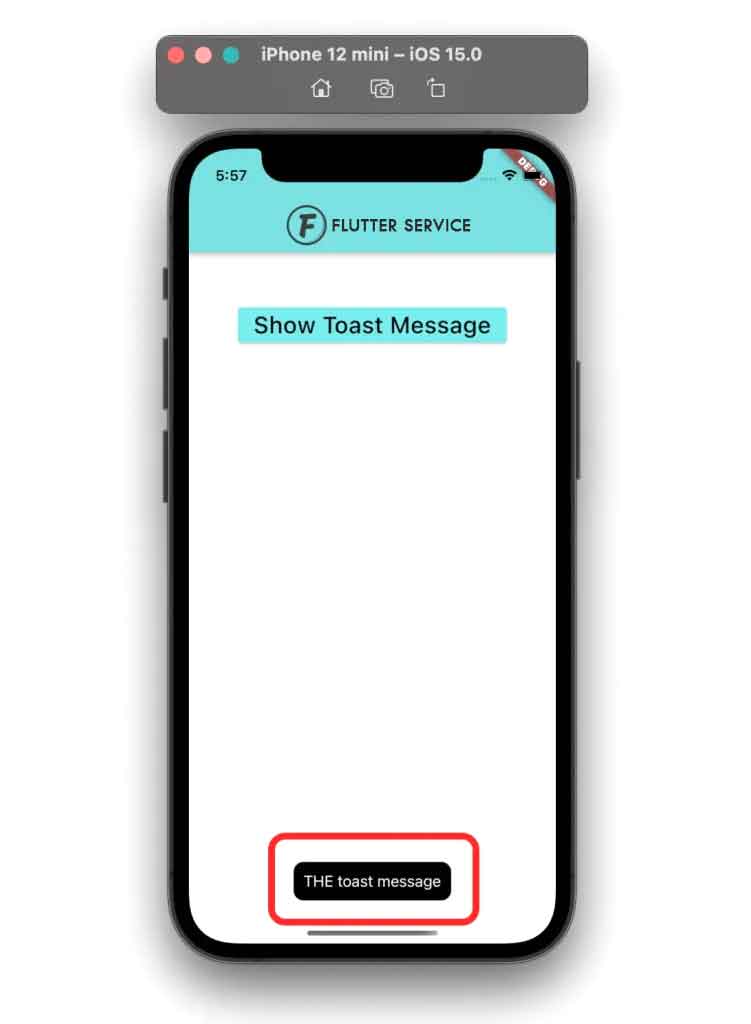
Use the fluttertoast plugin if you want to display the toast exactly how THE Toast does.
How to use the Fluttertoast plugin to show Toast:
First, visit the dependency and pubspec.yaml files.
dependencies: flutter: sdk: flutter # The following adds the CupertinoIcons font to your application. # Usewith the CupertinoIconsclassfor iOS style icons. cupertino_icons:^1.0.2 fluttertoast:^8.0.8 # <--SEEHERE
If you haven’t already, step 2 is to add the button (ElevatedButton).
The third step is to call the inside of a button’s onPressed method. Fluttertoast.showToast method with a message to be displayed.
This tutorial demonstrated using real-world examples how to display toast in Flutter. We first recognized the need to include toast in flutter before identifying the two alternative methods, including the SnackBar and the fluttertoast plugin, to display toast in flutter.
Do you want to look at some more engaging Flutter tutorials?
This article will provide 3 best ways to add flutter textfield initial value.
One of the most popular and significant widgets is the Flutter TextField initial value one. You can accept various user inputs through it. The Flutter TextField initial value widget may be utilized in a straightforward form or as the main component of an entire messaging program. The initial value may, however, occasionally need to be added to the Textfield. Therefore, we’ll learn the top 3 ways to add a TextField’s initial value in Flutter in this tutorial.
Table of Contents
As shown below, the TextField has a starting value:
Flutter textfield initial value
TextField Requires Initial Value
Depending on your app, there may be a number of situations where you need to add the first value to Flutter TextField initial value. The messaging app is a typical example, where a user types a message, navigates to another area of the app (without sending a message), and then returns. In this case, the unsent message should be displayed once more in the TextField.
Flutter TextField Initial Value Add-On Techniques
Three different methods can be used to add the TextField initial value in Flutter:
By making a special TextEditingController, setting its text property to the text you want to display, and then assigning the TextEditingController to the actual TextField, you can add the initial value to TextField.
The process:
Create the TextEditingController in step 1.
The second step is to add the text to the TextEditingController’s text property.
Assign the TextEditingController to the TextField in step three.
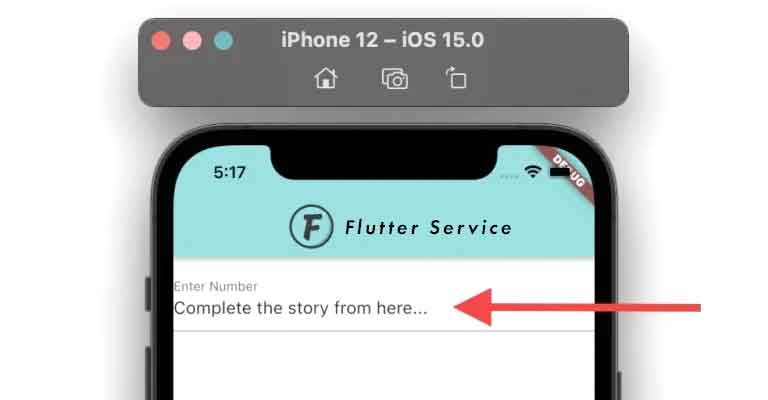
Examples of codes
// Step 1 <- SEE HERETextEditingController _controller =newTextEditingController();@overridevoidinitState() {// TODO: implement initStatesuper.initState();// Step 2 <- SEE HERE _controller.text ='Complete the story from here...';}// Step 3 <- SEE HERETextField( controller: _controller, decoration:InputDecoration(labelText:'Enter Number'),),
How to Use
When you want to use the TextEditingController instance for additional purposes, use this strategy. For instance, updating and clearing while using the same TextEditingController instance
Output:
Making use of TextEditingController
Making Direct TextEditingController available
By including the direct TextEditingController to the TextField and then setting the text parameter to the desired text, you can also add the initial value to the TextField.
The process
Add the controller parameter and assign the TextEditingController inside the TextField widget.
The text parameter and the desired text should be added inside the TextEditingController in step 2.
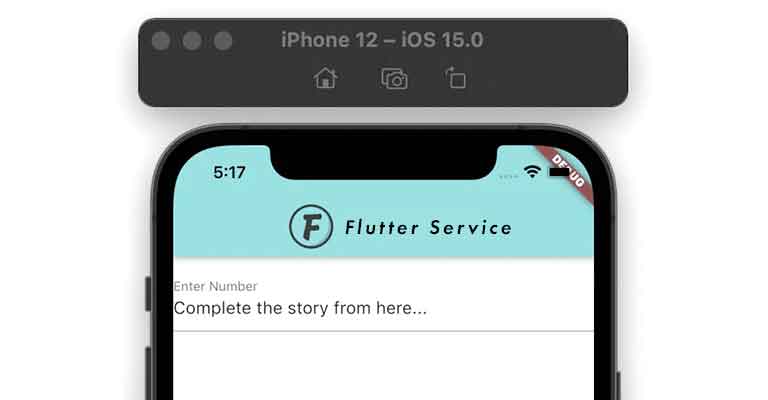
Examples of codes
TextField( controller:TextEditingController(text:"Complete the story from here..."),// <-- SEE HERE decoration:InputDecoration(labelText:'Enter Number'),),
How to Use
Use this method if you don’t want to update or clear the text or use the TextEditingController instance for other tasks.
Output:
Making Direct TextEditingController available
By means of TextFormField
The initial text can be displayed using the TextFormField, which is distinct from the TextField widget.
The process
Place the TextFormField widget first.
Add the initialValue parameter inside the TextFormField and enter the text you want to appear prefilled.
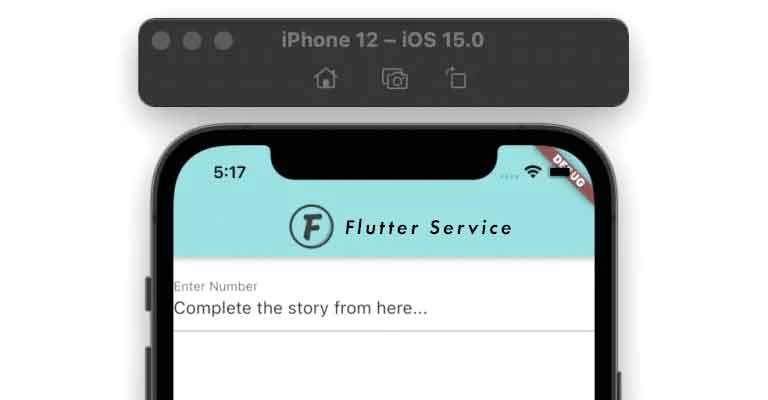
Examples of codes
TextFormField( autofocus:false, initialValue:'Complete the story from here...',// <-- SEE HERE decoration:InputDecoration( hintText:'Enter Number', ),),
How to Use
When creating a form that needs user input validation, you should take this strategy into consideration.
Output:
By means of TextFormField
Conclusion
With the help of real-world examples, we learned how to add TextField initial value in Flutter in the first discussed the necessity of adding the initial value to the TextField before going over the various approaches, including using the TextEditingController and TextFormField.xtFormField. We also knew when to apply each strategy.
Would you like to view some additional engaging Flutter tutorials?
Do you face the Unable to Load Asset Flutter error? Or does your Media or any file not load on flutter? Then this article is for you. We will solve this issue in a simple way. Media is the most needed on any mobile app. Any media resource is called assets on Flutter. For example- images, videos, pdf files, etc. When you try to load any assets you may make some mistakes and get an error “unable to load asset flutter“. In this article, we will fix this error step by step.
We will discuss the following things in this article:
What does the error look like?
Why does this error happen?
How to Fix Unable to Load Asset Flutter Error?
What does the error look like?
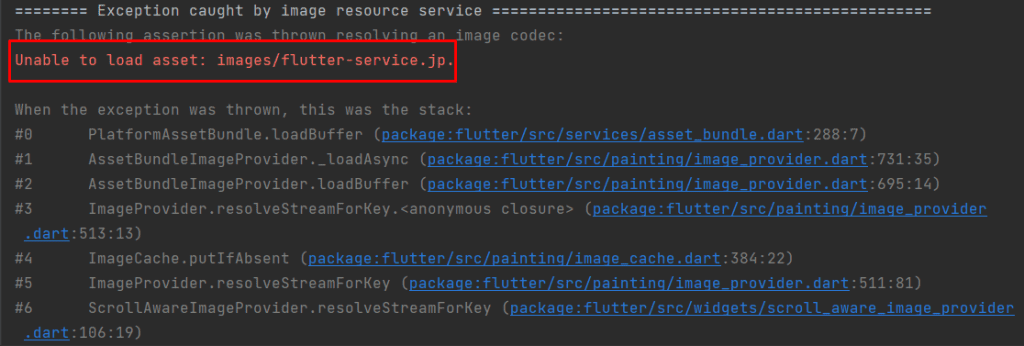
The Unable to Load Asset Flutter error looks like this:
======== Exception caught by image resource service ================================================The following assertion was thrown resolving an image codec:Unable to load asset:images/flutter-service.jp.When the exception was thrown, this was the stack:#0 PlatformAssetBundle.loadBuffer (package:flutter/src/services/asset_bundle.dart:288:7)#1 AssetBundleImageProvider._loadAsync (package:flutter/src/painting/image_provider.dart:731:35)#2 AssetBundleImageProvider.loadBuffer (package:flutter/src/painting/image_provider.dart:695:14)#3 ImageProvider.resolveStreamForKey.<anonymous closure> (package:flutter/src/painting/image_provider.dart:513:13)#4 ImageCache.putIfAbsent (package:flutter/src/painting/image_cache.dart:384:22)#5 ImageProvider.resolveStreamForKey (package:flutter/src/painting/image_provider.dart:511:81)#6 ScrollAwareImageProvider.resolveStreamForKey (package:flutter/src/widgets/scroll_aware_image_provider.dart:106:19)#7 ImageProvider.resolve.<anonymous closure> (package:flutter/src/painting/image_provider.dart:358:9)#8 ImageProvider._createErrorHandlerAndKey.<anonymous closure> (package:flutter/src/painting/image_provider.dart:473:24)<asynchronous suspension>Image provider:AssetImage(bundle:null, name:"images/flutter-service.jp")Image key:AssetBundleImageKey(bundle:PlatformAssetBundle#02edd(), name:"images/flutter-service.jp", scale:1.0)
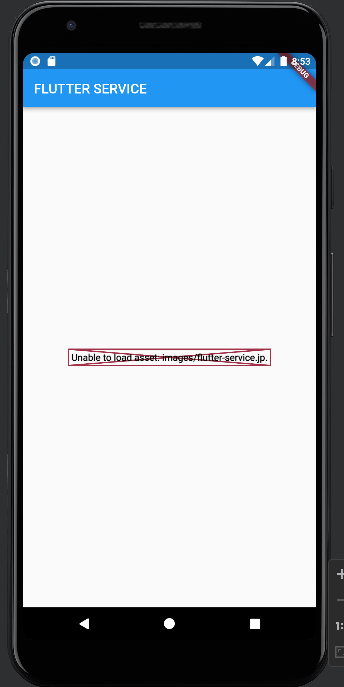
You also get this error on your device like this:
Why does this error happen?
The error can happen for the following reasons:
Spelling mistake on that image name.
Image path is wrong.
Wrong indentation for assetsin pubspec.yaml file
Actually, if you have not added the image appropriately on your flutter app then you may see Unable to Load Asset Flutter error.
How to Fix Unable to Load Asset Flutter Error?
The error can be fixed by following steps:
Ensure that you have added the correct image path without any spelling mistake.
To get the correct image path, right-click on the image > select Copy Path > select Path From Content Root and then paste the image path.
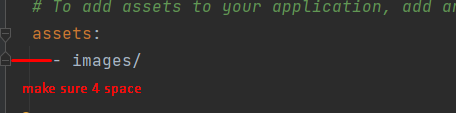
Verify the correct indentation path on pubspec.yaml
# To add assets to your application, add an assets section, like this:assets:-images/
This is how you can solve the Unable to Load Asset Flutter issue very easily. We first see what the error looks like then we see how to solve this Unable to Load Asset Flutter error step by step. If you don’t solve the issue then leave a comment, we are here to help you.
Do you face and error like this: android studio dart sdk not configured”? If you face then this article will solve your issues.
Flutter already gained huge community with many awesome people who contribute. When you search some features or anything that time you may get open source solution to Github or anywhere. You may need to clone the project to achieve the specific features. So when you clone the project that time you may face an error “flutterandroid studio dart sdk not configured” in Windows, Linux or Mac. So in this article, we will fix those issues easily.
Let’s know what we’ll cover:
How the android studio dart sdk not configured error looks like?
Why this error occur?
How to fix Flutter dart sdk not configured error?
How the android studio dart sdk not configured error looks like?
The error look like when you clone the project and try to run it on your Android Studio or VS code.
Why this error occur?
This error occur when you run a project that is not created from your machine. So the origin of the project might have a different dart SDK path in his/her machine. This is why you may get the android studio dart SDKnot configured.
How to fix Flutter dart SDK not configured error?
To fix this Dart SDK not found error, you must get the Flutter Installation Path and then figure out the Dart SDK path. Then enable the Dart Support for the project and let your Android studio know about the Dart SDK. Follow the simple following steps to solve those issues:
Open terminal in Mac/Linux or command prompt on Windows.
Write which flutter and Copy the flutter installation path.
Open Android Studio,
– For Windows/Linux: Go to File > Settings > Language & Framework > Dart
– For Mac: Click Android Studio on top > Preferences > Languages & Framework > Dart
Check the Enable Dart support for the project
Dart SDK path, enter your previously copied path and replace the flutter in the end with cache/dart-sdk. It would be look like this:
When you add external packages, it makes it easier for you to achieve the complex feature of your app. Sometimes when you add external packages, you may face an issues regarding “flutter.minsdkversion” that asks you to increase the minSdkVersion. This is happen because that plugin required the higher android SDK version for the project.
Here the following question you will be answer from this article:
Way 1: Where is flutter.minsdkversion before the flutter 2.8 update.
Way 2: Where is flutter.minsdkversion after the flutter 2.8 update?
There are two ways two change the android flutter.minsdkversion. Way1 is for the project before flutter 2.8. Way2 is for the project after flutter 2.8.
Way 1: Where is flutter.minsdkversion before the flutter 2.8 update
To find and change the flutter minSdkVersion for the project created before 2.8 update, you can directly make change inside the build.gradle file.
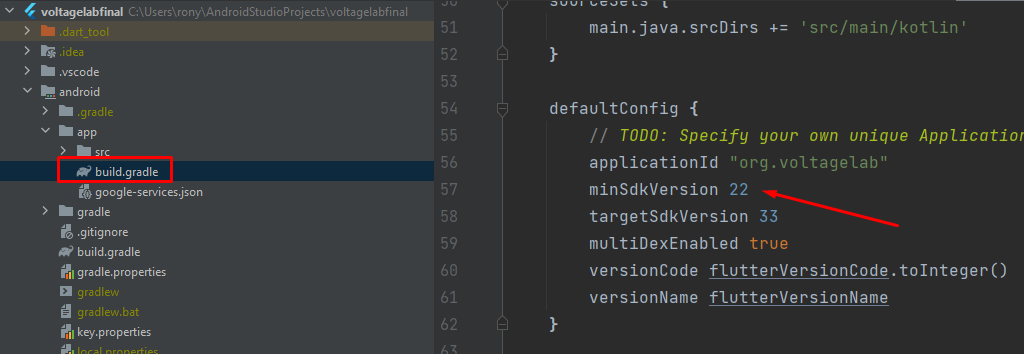
Step1: Go to this location: project_folder/android/app/build.gradle
Step2: Find out the defaultConfig section and the update the minSdkVersion to the new version.
Step3: Inside the terminal, run flutter clean command and re-run your app.
Code:
defaultConfig {
        // TODO: Specify your own unique Application ID (https://developer.android.com/studio/build/application-id.html).
        applicationId "org.voltagelab"
        minSdkVersion 22 // <-- SEE HERE
        targetSdkVersion 33
        multiDexEnabled true
        versionCode flutterVersionCode.toInteger()
        versionName flutterVersionName
    }
Screenshot
Way 2: Where is flutter.minsdkversion after the flutter 2.8 update?
If you want to change the flutter.minsdkversion after the flutter 2.8 update then you have to make change the local.properties file and then reference the new variable from the local.properties file inside the build.gradle file.
Step1: Go to the location: project_folder/android/local.properties
Step2: In local.properties file, add the line as: flutter.minSdkVersion=22
Step3: Now open build.gradle file from this location: project_folder/android/app/build.gradle
Step4: Find the defaultConfig section and update the minSdkVersion to the localProperties.getProperty(‘flutter.minSdkVersion’).toInteger()
Step5: Run the flutter clean command into the terminal and run the app.
Code:
sdk.dir=C:\\Users\\rony\\AppData\\Local\\Android\\sdkflutter.sdk=C:\\Users\\rony\\flutterflutter.buildMode=debugflutter.versionName=1.2.7flutter.versionCode=34flutter.minSdkVersion=22---------------------------------------------------------------------defaultConfig { // TODO: Specify your own unique Application ID (https://developer.android.com/studio/build/application-id.html). applicationId "org.voltagelab" minSdkVersion localProperties.getProperty(‘flutter.minSdkVersion’).toInteger() targetSdkVersion flutter.targetSdkVersion multiDexEnabled true versionCode flutterVersionCode.toInteger() versionName flutterVersionName }
This is how you can get Where is flutter.minsdkversion and change the minSdkVersion flutter. We hope that you can solve this issues. If you face any issues, you can leave a comment.
This tutorial sheds light on how to make a color picker in flutter in just 3 steps!
Using the flutter_colorpicker library, we can easily implement a color-picking system if the app needs one. Because it is simple to customize, it saves time and improves user experience. Using the flutter_colorpicker library, we will build color pickers in this article. For better comprehension, follow along.
First, we must include flutter_colorpicker in the pubspec.yaml file before we can use this library. Select one of the two techniques listed below to add it to the file.
In the terminal of a functioning IDE, type the following command:
flutter pub add flutter_colorpicker
Or simply include it in the dependencies section. Next, go to the pub.
Dependencies
Importing a package
Following that, we must import the library in the manner described below:
We create the variables currentColor and ListColor> currentColors in the Color class. In addition, we’re developing two features:
Changes a color by taking color as a parameter.
Changes the colors in a list using the parameter changeColors(ListColor>).
When the changeColor() or changeColors() functions are used, the currentColor variable’s value and the currentColors list, respectively, are modified.
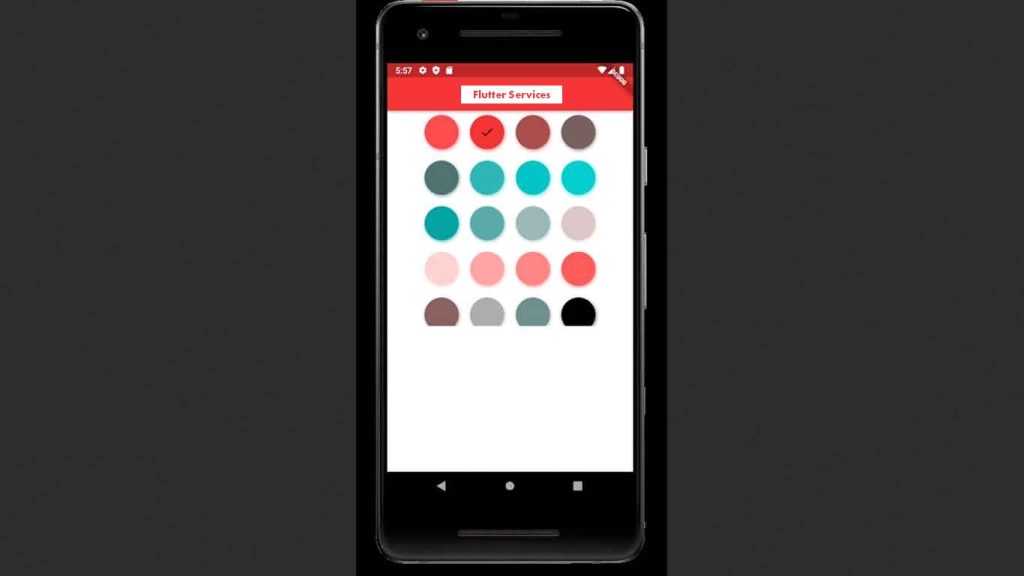
BlockPicker
PickerColor (Color) and onColorChanged (Function) are the two features needed by the BlockPicker() widget. However, in this case, we are only using these two properties to create a basic color picker. When a color is chosen to use the BlockPicker() widget, the pickerColor value is assigned to the appBar background color because the appBar background color has been set to be the currentColor.
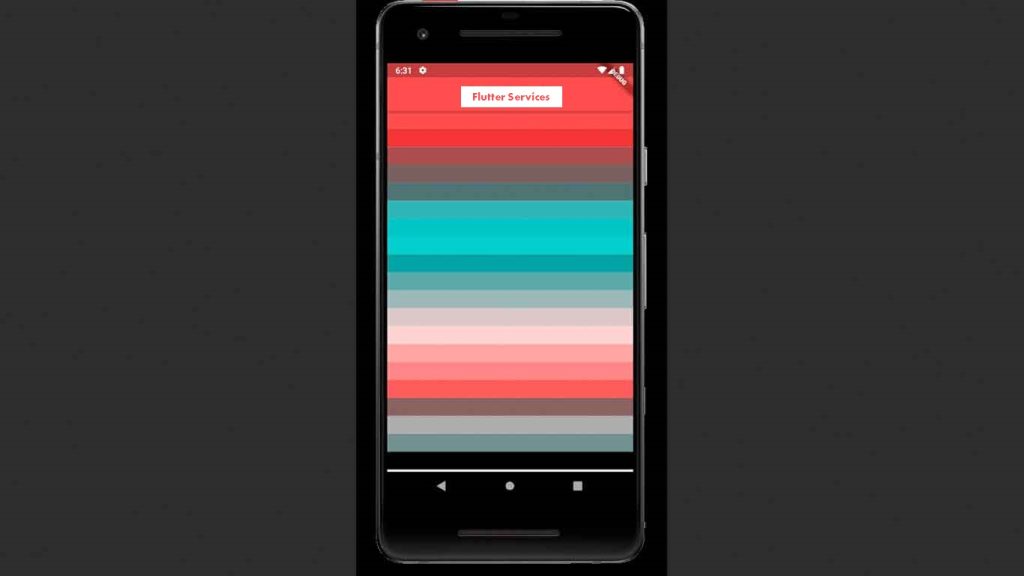
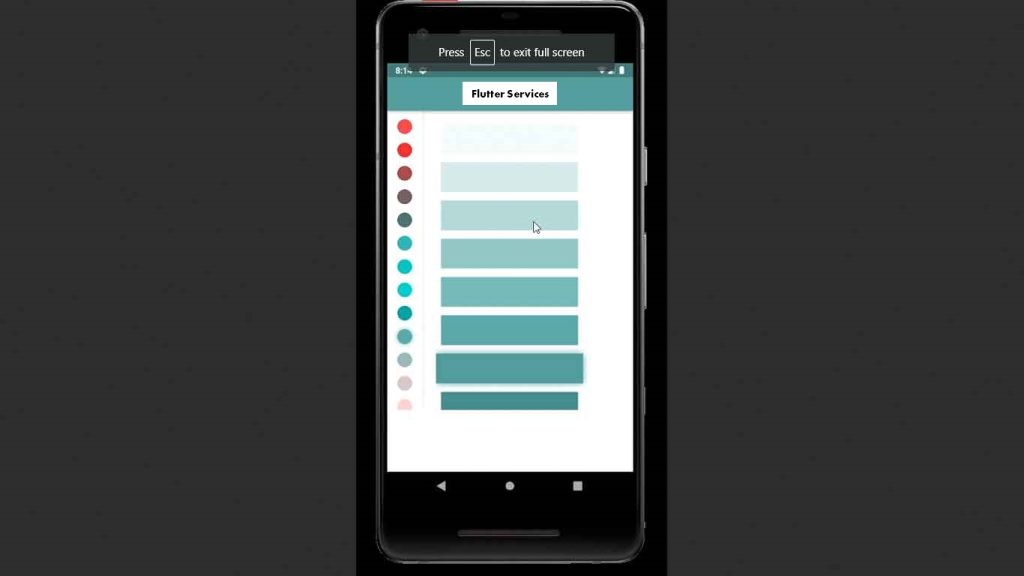
If we want to alter the structure of the color picker, we can also alter the layout. For instance, ListView.builder() is used in the code below to display colors in the list structure.
PickerColor (Color) and onColorChanged (Function) are additional properties needed by the MaterialPicker() widget. The function changeColor and changeColors remain the same.
Because of its efficiency and simplicity, the color picker in Flutter is one of the most used components, especially in mobile applications. In this tutorial, we created a straightforward color picker in Flutter using the built-in widget of the color picker in Flutter. I sincerely hope you liked this tutorial!
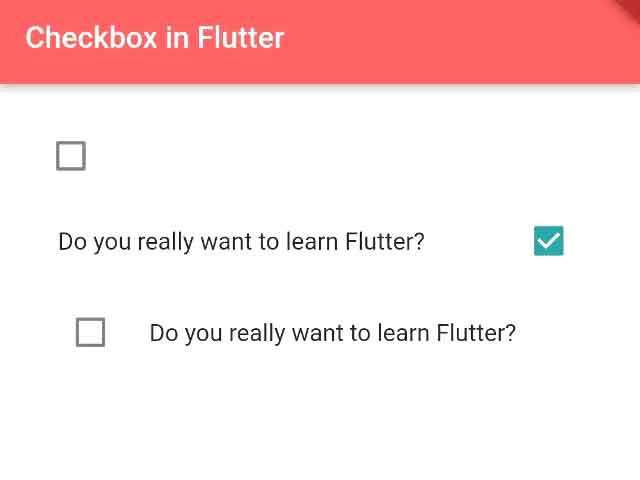
In this example, we’ll demonstrate how to add a checkbox in Flutter and make it switchable when the user clicks the label on the box. For any form, checkboxes are crucial elements. Here’s an illustration:
Table of Contents
Checkbox Addition in Flutter
bool? check1 =false;//true for checked checkbox, false for unchecked one
Checkbox( //only check box value: check1,//unchecked onChanged: (bool? value){//value returned when checkbox is clickedsetState(() { check1 = value; }); })
Only a checkbox with an unchecked status is available here.
bool? check2 =true,;
CheckboxListTile( //checkbox positioned at right value: check2, onChanged: (bool? value) { setState(() { check2 = value; }); }, title:Text("Do you really want to learn Flutter?"),)
You will see a checkbox with a label here, but the checkbox’s status won’t change unless you click on it. Not clickable is the label.
How to Set the Left Checkbox on the CheckboxListTile
bool? check3 =false;
CheckboxListTile( value: check3, controlAffinity:ListTileControlAffinity.leading,//checkbox at left onChanged: (bool? value) { setState(() { check3 = value; }); }, title:Text("Do you really want to learn Flutter?"),)
You will see a checkbox with a label that you can click here.
Checking whether a checkbox is selected:
bool? check1 =false;
Checkbox( value: check1,//set variable for value onChanged: (bool? value){setState(() { check1 = value; }); })if(check1!){//checkbox is checked}else{//checkbox is not checked}
Code to add a Check Box in Flutter
import'package:flutter/material.dart';voidmain(){runApp(MyApp());}classMyAppextendsStatelessWidget{@overrideWidgetbuild(BuildContext context) {returnMaterialApp( home:Home(), ); }}classHomeextendsStatefulWidget{@override_HomeStatecreateState() =>_HomeState();}class_HomeStateextendsState<Home> { bool? check1 =false, check2 =true, check3 =false;//true for checked checkbox, flase for unchecked one@overrideWidgetbuild(BuildContext context) { returnScaffold( appBar:AppBar( title:Text("Checkbox in Flutter"), backgroundColor:Colors.redAccent ), body:Container( padding:EdgeInsets.only(top:20, left:20, right:20), alignment:Alignment.topLeft, child:Column( crossAxisAlignment:CrossAxisAlignment.start, children: [ Checkbox( //only check box value: check1,//unchecked onChanged: (bool? value){//value returned when checkbox is clickedsetState(() { check1 = value; }); } ),CheckboxListTile( //checkbox positioned at right value: check2, onChanged: (bool? value) { setState(() { check2 = value; }); }, title:Text("Do you really want to learn Flutter?"), ),CheckboxListTile( //checkbox positioned at left value: check3, controlAffinity:ListTileControlAffinity.leading, onChanged: (bool? value) { setState(() { check3 = value; }); }, title:Text("Do you really want to learn Flutter?"), ), ],) ) ); }}
Check Box in Flutter
This will enable you to add a checkbox to the Flutter application.
Do you get any issues like “Flutter Remove REQUEST_INSTALL_PACKAGES Permission From Play Console“? If you uploaded an app from on Google Play Store and got rejected with this warning “Remove REQUEST_INSTALL_PACKAGES Permission From Play Console” then this article is for you. In this article, we will discuss in details about how to Fix Flutter and Remove REQUEST_INSTALL_PACKAGES Permission From Play Console. So let’s what we discuss step by step:
Why did my app get rejected with REQUEST_INSTALL_PACKAGES Permission?
Find out which package is called this REQUEST_INSTALL_PACKAGES Permission.
Fix Flutter Remove REQUEST_INSTALL_PACKAGES Permission From Play Console.
Why did my app got rejected with REQUEST_INSTALL_PACKAGES Permission
If you use a package that generates this ” flutter REQUEST_INSTALL_PACKAGES Permission” on manifest and this permission is not the app core functionality then you will get rejected with this warning.
Basically, people get this warning with the following email:
Hi Developers at Voltage Lab,
Your app Voltage Lab: EEE Engineers Pro has been rejected from Google Play for not resolving the previously communicated policy issue (copied below for your reference). To resolve this issue and get your app changes published on Google Play, please address the issues highlighted in the earlier email and resubmit the app.

Publishing Status
App Status: Rejected
Your app has been rejected and wasn't published due to the policy issue(s) listed below. If you submitted an update, the previous version of your app is still available on Google Play.


Issue found: Permission use is not directly related to your app's core purpose.
We found that your app is not compliant with how REQUEST_INSTALL_PACKAGES permission is allowed to be used. Specifically, the use of the permission is not directly related to the core purpose of the app.

Additionally, follow these steps to bring your app into compliance:

Please remove the use of REQUEST_INSTALL_PACKAGES permission from your app.
About the Request Install Packages Permission
The REQUEST_INSTALL_PACKAGES permission allows an application to request the installation of app packages. To use this permission, your app’s core functionality must include:

Sending or receiving app packages, AND
Enabling user-initiated installation of app packages.
Permitted functionalities include any of the following:

Web browsing or search
Communication services that support attachments
File sharing, transfer or management
Enterprise device management
Backup and restore
Device migration / phone transfer
The REQUEST_INSTALL_PACKAGES permission may not be used to perform self updates, modifications, or the bundling of other APKs in the asset file unless for device management purposes. All updates or installing of packages must abide by Google Play’s Device and Network Abuse policy and must be initiated and driven by the user.

For more help addressing this issue, read more in our Help Center.
Action required: Submit an updated app for review
Here's what to do to help get your app on Google Play:
Make sure to read the applicable policies or requirements listed below:
Request Install Packages Permission
Make appropriate changes to your app (if possible), and be sure to address the issue described above. You may also want to check your app's store listing for compliance, if applicable.
Double check that your app is compliant with all other Developer Program Policies.
If you made changes to your app bundle, store listing, or APK, please sign in to your Play Console and submit the update(s).
Find out which package called this Flutter REQUEST_INSTALL_PACKAGES Permission
To find out the exact package which generates this REQUEST_INSTALL_PACKAGES Permission then you have to follow the following steps:
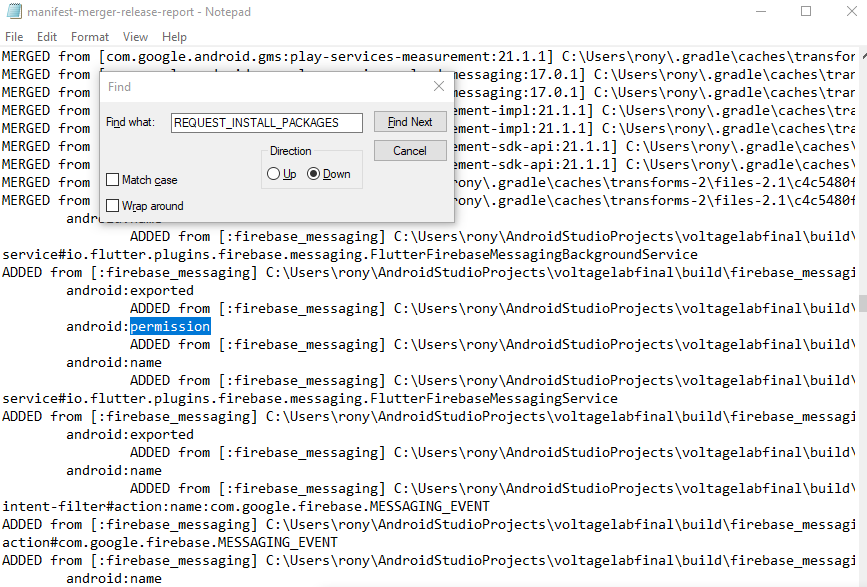
First generate the app-released version from Build > Flutter > Build App Bundle. Now go to your project root folder and open > build/app/outputs/logs/manifest-merger-release-report.txt Now check which package generate that permission.
This is what the text file looks like. In most cases, the open_file package created these issues
Fix Flutter Remove REQUEST_INSTALL_PACKAGES Permission From Play Console
When you get that which package is called the flutter REQUEST_INSTALL_PACKAGES Permission, it will be easy for you to solve the issues. Removes that package and use it instead.
The second step is to remove the flutter REQUEST_INSTALL_PACKAGES from AndroidMainfiest.xml. Go to this location [android/app/src/main/AndroidManifest.xml] and remove if any flutter REQUEST_INSTALL_PACKAGES permission is there.
The third step is to add the following code on the manifest: android/app/src/main/AndroidManifest.xml
If this adding manifest code creates an error then you can remove this code. Don’t worry.
Fourth step: Now again build the app bundle.
The fifth step: Now Open Play Console and go to the testing page check if there are any app bundles in:
Open testing (Testing > Open testing)
Closed testing (Testing > Closed testing).
Internal testing (Testing > Internal testing).
If it exists then create a new release and add the uploaded app bundle.
The sixth step: go to the Production page and create a new release then add it for review.
Note: If there is an app bundle that you previously uploaded on the test page and it was accepted by Google before, be sure to replace it by creating a new release and add the uploaded app bundle.
This is how you can solve the Flutter Remove REQUEST_INSTALL_PACKAGES Permission. If you have any question, just leave a comment below.