
When you add external packages, it makes it easier for you to achieve the complex feature of your app. Sometimes when you add external packages, you may face an issues regarding “flutter.minsdkversion” that asks you to increase the minSdkVersion. This is happen because that plugin required the higher android SDK version for the project.
Here the following question you will be answer from this article:
- Way 1: Where is flutter.minsdkversion before the flutter 2.8 update.
- Way 2: Where is flutter.minsdkversion after the flutter 2.8 update?
There are two ways two change the android flutter.minsdkversion. Way1 is for the project before flutter 2.8. Way2 is for the project after flutter 2.8.
Way 1: Where is flutter.minsdkversion before the flutter 2.8 update
To find and change the flutter minSdkVersion for the project created before 2.8 update, you can directly make change inside the build.gradle file.
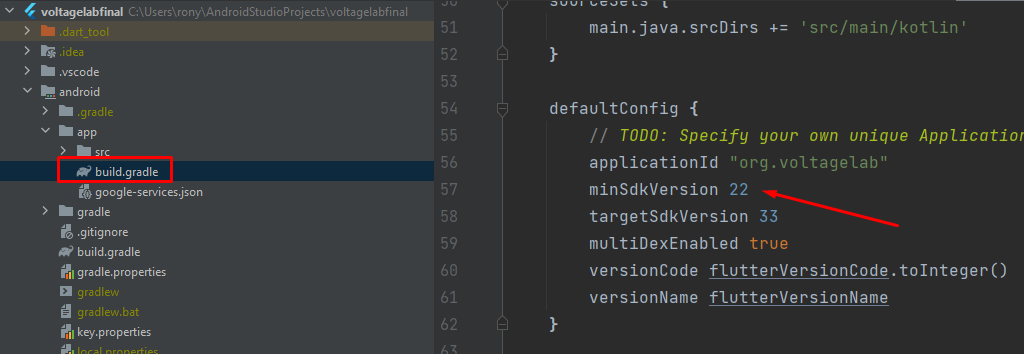
Step1: Go to this location: project_folder/android/app/build.gradle
Step2: Find out the defaultConfig section and the update the minSdkVersion to the new version.
Step3: Inside the terminal, run flutter clean command and re-run your app.
Code:
defaultConfig {
        // TODO: Specify your own unique Application ID (https://developer.android.com/studio/build/application-id.html).
        applicationId "org.voltagelab"
        minSdkVersion 22 // <-- SEE HERE
        targetSdkVersion 33
        multiDexEnabled true
        versionCode flutterVersionCode.toInteger()
        versionName flutterVersionName
    }
Screenshot
Way 2: Where is flutter.minsdkversion after the flutter 2.8 update?
If you want to change the flutter.minsdkversion after the flutter 2.8 update then you have to make change the local.properties file and then reference the new variable from the local.properties file inside the build.gradle file.
Step1: Go to the location: project_folder/android/local.properties
Step2: In local.properties file, add the line as: flutter.minSdkVersion=22
Step3: Now open build.gradle file from this location: project_folder/android/app/build.gradle
Step4: Find the defaultConfig section and update the minSdkVersion to the localProperties.getProperty(‘flutter.minSdkVersion’).toInteger()
Step5: Run the flutter clean command into the terminal and run the app.
Code:
sdk.dir=C:\\Users\\rony\\AppData\\Local\\Android\\sdk
flutter.sdk=C:\\Users\\rony\\flutter
flutter.buildMode=debug
flutter.versionName=1.2.7
flutter.versionCode=34
flutter.minSdkVersion=22

---------------------------------------------------------------------

defaultConfig {
        // TODO: Specify your own unique Application ID (https://developer.android.com/studio/build/application-id.html).
       applicationId "org.voltagelab"
       minSdkVersion  localProperties.getProperty(‘flutter.minSdkVersion’).toInteger()
       targetSdkVersion flutter.targetSdkVersion
       multiDexEnabled true
       versionCode flutterVersionCode.toInteger()
       versionName flutterVersionName
    }
This is how you can get Where is flutter.minsdkversion and change the minSdkVersion flutter. We hope that you can solve this issues. If you face any issues, you can leave a comment.
If you want to learn engineering visit our Electrical & Electronics Engineering blog site.
Read More:


