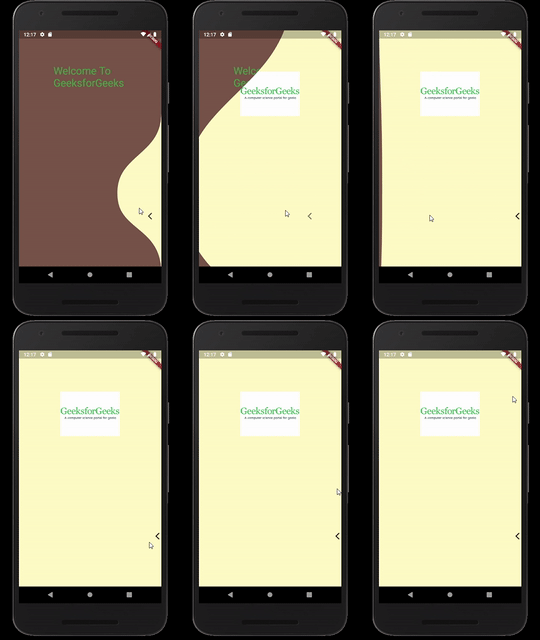
How do you make a flutter liquid swipe animation? We’ll demonstrate how to incorporate a liquid Swipe animation into your Flutter application using a demo program. The Liquid Swipe animation was impressive and was created for the Android, iOS, and React Native platforms.
Table of Contents
Flutter Liquid Swipe Animation
A screen movement known as Liquid Swipe animation has the appearance of moving water. Most of the time, these animations have a moderate, fluid development that might wave or repeat patterns. (Additionally, the need for realistic-feeling liquid swipe animation is what makes it work.) Liquid swipe animation may create results as a floating state or swiping action.
Requirements
- Flutter
- Android Studio or VS Code
- Both editors need the installation of the Flutter and Dart plugins.
Widgets Used
Since iOS, Android, and web-enabled devices can effectively utilize the strategy, it has actually started to explode in popularity. We will require the liquid_swipe package for this animation. Liquid Swipe is a New Page that Unveils Liquid Animation.
- Row Widget
- Liquid Swipe Widget
- Stack Widget
- Button Widget
- Positioned Widget
- Image Widget
- Icon Widget
People, who read this article also read: Flutter LayoutBuilder Widget Example Step by Step
Creating a Flutter Swiper Animation
Simply use the liquid swipe package and within the page’s property.
- We add some colored containers with this.
- We can swipe horizontally between the container pages.
- Optionally set both these properties to have a side reveal bar on the right side.
- Next, we wrap a stack widget around the liquid swipe widget.
- After the liquid swipe widget, we add a position widget with this.
- We position a row widget with two text buttons.
- At the bottom of the screen to add some functionality to these buttons we add a controller within the liquid swipe widget that we initialize within the state.
- Next, we use this controller to implement the functionality of the skip and also of the next button with this.
- If I click on the next button then we go to the next page and if we click on the skip button then we go directly to the last page.
- Also between both text buttons, you can add a dot indicator that comes from the smooth page indicator package.
- With this, we can tap on the different dots to navigate between the pages or if we basically swipe between the pages then you see the progress in this dot indicator.
Make sure to also add this callback to make the dot indicator work and finally we replace the container widgets with real page.
Example how to create a flutter liquid swipe animation
Step 1: Use the command to create a Flutter app:
flutter create liquid_swipeStep 2: Make a file in both main.dart and home.dart to write code.
Step 3: Incorporate the liquid_swipe dependency using the code found in main.dart:
import 'package:liquid_swipe/liquid_swipe.dart';
import 'package:flutter/src/material/icons.dart';
Step 4: Add the requirement to your pubspec.yaml file as displayed below:
version: 1.0.011

environment:

sdk: ">=2.7.0 <3.0.0"

dependencies:

flutter:

sdk: flutter

# The following adds the Cupertino Icons font to your application. # Use with the CupertinoIcons class for ios style icons. cupertino icons: 0.1.3

liquid swipe: 1.5.0
Step 5:
Establish dependencies on pubspec.yaml
liquid_swipe: ^2.1.1Get the package from Pub:
flutter packages getIncorporating the attributes together
Step 5: As shown below, we must add the following attributes to the LiquidSwipe() method: pages, fullTransitionValue, waveType, positionSlideIcon, and enableSlideIcon.
body:LiquidSwipe(
   pages: page,
 enableLoop: true,
 fullTransitionValue: 300,
 enableSlideIcon: true,
 waveType: WaveType.liquidReveal,
 positionSlideIcon: 0.5,
),
With any widget as an argument, the main() function in the main.dart file calls runApp() to create the layout. We have a stateful class (mutable class) called MyliquidSwipe() with the following home:
import 'package:flutter/material.dart';
import './liquid_swipe.dart';
void main() {
runApp(
	MaterialApp(

		title: "My Ani",
		home: MyliquidSwipe(),
		),
	);
	}
Step 6: In the assets folder, we will add images. You can add there any images you require to be displayed. Activate assets in pubspec.yaml file as shown below:
assets:
- assets/
The Complete Source Code:
import 'package:flutter/material.dart';
import 'package:liquid_swipe/liquid_swipe.dart';
import 'package:flutter/src/material/icons.dart';
class MyliquidSwipe extends StatelessWidget {

@override
Widget build(BuildContext context) {
final page = [
	Container(
	color:Colors.brown,
	child: Padding(
		padding: const EdgeInsets.all(100.0),
		child: Center(
		child: Column(
			children:<Widget>[

			Text("Welcome To GeeksforGeeks",style:TextStyle(
			fontSize: 30,
			color:Colors.green[600],
			),
			),

			]
		),
		),
	),),
Container(color:Colors.yellow[100],
child: Padding(
	padding: const EdgeInsets.all(120.0),
	child: Center(
		child: Column(
			children:<Widget>[
			Image.asset("assets/save.png"),
			Text("",style:TextStyle(
			fontSize: 20,
			color:Colors.green,
			),
			)
			]
	),),
),),

Container(color: Colors.blue[100],
child: Padding(
	padding: const EdgeInsets.all(100.0),
	child: Center(
		child: Column(
			children:<Widget>[

			Text(" GeeksforGeeks A Computer Science portal
					for geeks",
			style:TextStyle(
			fontSize:30 ,
			color:Colors.green[600],
			),
			),
	]),),
))];
	return Scaffold(
	body: LiquidSwipe(
		enableLoop: false,
		pages: page,
		slideIconWidget: Icon(Icons.arrow_back_ios),
	),
	);
}
}
Output:


Conclusion
We learned how to create Flutter Liquid Swipe Animation in this tutorial. Additionally, using real-world examples, we looked at how to modify options, make new pages, and provide icons when hovered or clicked. In the end, we discovered how to create a Flutter Liquid Swipe Animation from a single location.
People who read this article also read: How to Use the Flutter Positioned Widget?


