This article will enable you to understand flutter layoutbuilder easily with examples. The Google-developed Flutter is not hard to master to begin with.
Flutter makes it very simple for developers to create a dynamic user interface. Flutter is a free and open-source tool for building mobile, desktop, and online apps with code. Pulsation automated testing enables you to achieve high responsiveness in your application by assisting in the discovery of bugs and other difficulties. Let’s see what we are going to discuss from flutter layoutbuilder.
Table of Contents
An Overview of Flutter Layoutbuilder
Flutter, Google’s UI toolkit, allows you to quickly create stunning, responsive, natively integrated apps for mobile, web, and desktop using a single codebase performance. Flutter offers outstanding developer tools, with exceptional hot reload.
Flutter LayoutBuilder widget assists you in creating a widget tree that is dependent on the size of the parent widget (a minimum and maximum width, and a minimum and maximum height).
- The LayoutBuilder Widget in Flutter is similar to the Builder widget.
- Flutter LayoutBuilder widget framework uses the builder function during layout.
- It supplies the parent widget’s restrictions.
- This is helpful when the parent limits the child’s size and does not rely on the child’s inherent size.
- The ultimate size of the LayoutBuilder will be the same as the size of its child.
The builder function is used in the following circumstances:
- The first time, the widget is arranged.
- When the parent widget satisfies various layout criteria.
- When the parent widget is updated, this widget gets updated.
- The dependencies to which the constructor function subscribes alter.
People who read this article also read: How to Use the Flutter Positioned Widget?
Layout Builder
LayoutBuilder aids in the creation of a widget tree in the widget flutter. The size of it is dependent on the size of the original widget. The layout builder may be sent to flutter as a parameter.
It has 2 functions
- Build context
- Boxconstrant
BuildContext is a widget name. However, the box constraint is more essential. Since it provides the width to the parent widget, which is used to control the child based on the size of the parent.
Difference between Flutter LayoutBuilder and MediaQuery
Adapting a layout to a platform may enable us to reach a larger audience. Another consideration is the vast variety of various devices, which presents additional hurdles to developers.
Developing to support numerous screen sizes is a difficulty that will always be present in a developer’s life, thus we need tools to best adapt to this. Flutter, once again, provides us with the tools we need to understand the environment in which the app operates so that we can act on it.
Flutter’s key classes for this purpose are LayoutBuilder and MediaQuery.
“The key difference between Media Query and LayoutBuilder is that Media Query uses the entire screen context rather than the size of your specific widget. While every widget’s maximum width and height are set by the layout designer.”
Implementation of the Code
You can use it in your code like the following part:
- Inside the lib folder, create a new dart file named main.dart. Or create the new project by VS code or Android Studio.
- Now we’ll go through the LayoutBuilder() class.
- Before utilizing the LayoutBuilder class, we created a container widget that will house the LayoutBuilder.
- The layout builder features three containers, each with its own color, text, and condition.
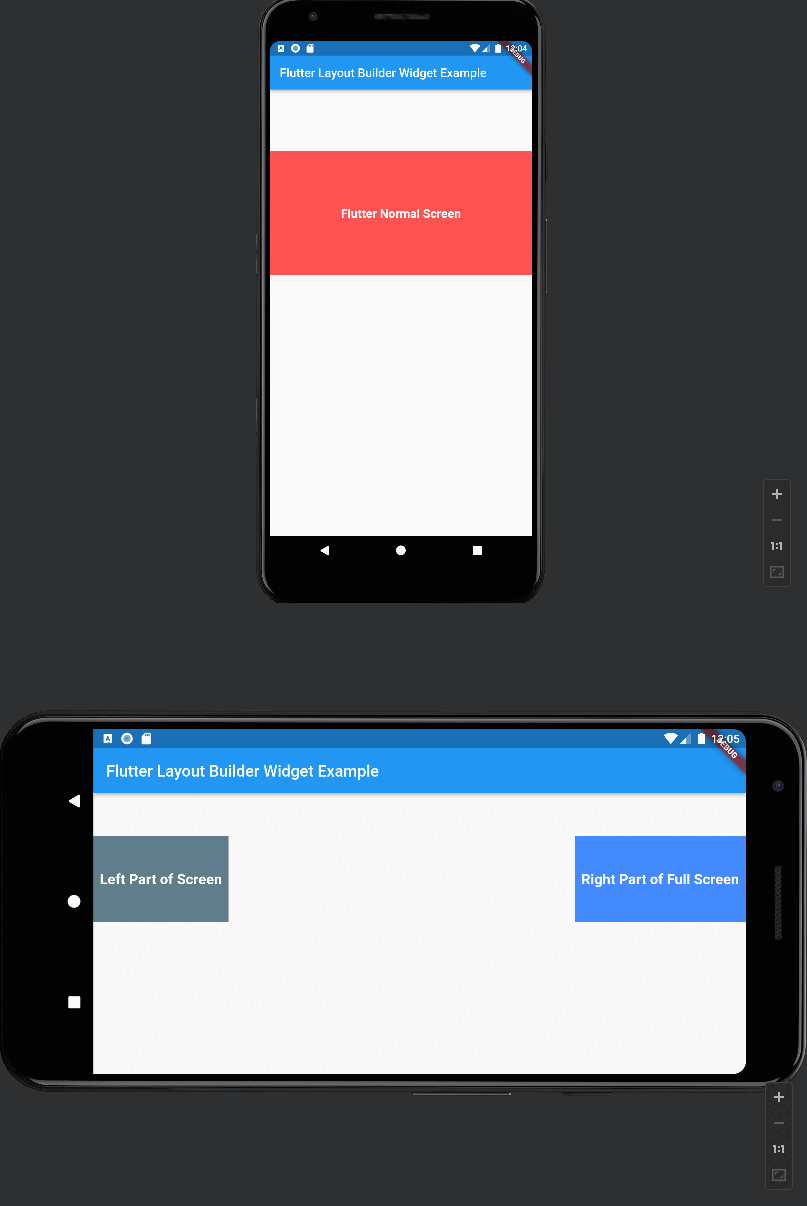
- If the user specifies a device width of more than 480, two container boxes will emerge, which will be visible when the tablet or screen is turned horizontally.
- Otherwise, the standard container will be seen.
Let us go through this in more depth with the assistance of a reference.
Syntax:
LayoutBuilder(
  builder: (BuildContext context, BoxConstraints constraints) {
    return Widget();
  }
)
Basic Example 1: When we use the parent’s constraints to calculate the child’s constraints, most commonly we use the flutter layoutbuilder widget.
import 'package:flutter/material.dart';
void main() {
  runApp(const MyApp());
}
class MyApp extends StatelessWidget {
  const MyApp({Key? key}) : super(key: key);
  @override
  Widget build(BuildContext context) {
    return MaterialApp(
      title: 'Flutter Demo',
      theme: ThemeData(
        primarySwatch: Colors.blue,
      ),
      home: const MyHomePage(title: 'Flutter Layout Builder Widget Example'),
    );
  }
}

class MyHomePage extends StatefulWidget {
  const MyHomePage({Key? key, required this.title}) : super(key: key);
  final String title;
  @override
  State<MyHomePage> createState() => _MyHomePageState();
}

class _MyHomePageState extends State<MyHomePage> {
  @override
  Widget build(BuildContext context) {
    return Scaffold(
      appBar: AppBar(
        title: Text(widget.title),
      ),
      body: Container(
        color: Colors.blueGrey,
        /// using MediaQuery
        /// [container's height] = [(phone's height) / 2]
        height: MediaQuery.of(context).size.height * 0.5,
        width: MediaQuery.of(context).size.width,
        /// Aligning contents of this Container
        /// to center
        alignment: Alignment.center,
        child: LayoutBuilder(
          builder: (BuildContext ctx, BoxConstraints constraints) {
            return Container(
              color: Colors.blueAccent,
              /// Aligning contents of this Container in center
              alignment: Alignment.center,
              /// just now calculate child's height and width
              height: constraints.maxHeight * 0.7,
              width: constraints.maxWidth * 0.7,
              child: const Text(
                'Flutter LayoutBuilder Widget',
                style: TextStyle(
                  fontSize: 22,
                  fontWeight: FontWeight.bold,
                  color: Colors.white,
                ),
              ),
            );
          },
        ),
      ),
    );
  }
}
Output:
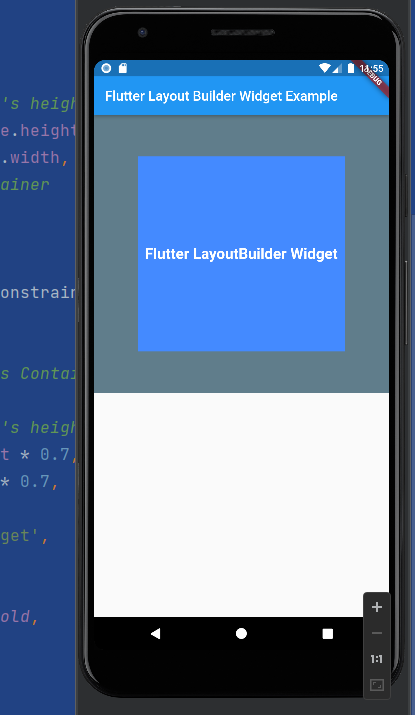

Example 2: Now we will see the multiple display different UI’s for different screen sizes for flutter layoutbuilder.
import 'package:flutter/material.dart';
void main() {
  runApp(const MyApp());
}
class MyApp extends StatelessWidget {
  const MyApp({Key? key}) : super(key: key);
  @override
  Widget build(BuildContext context) {
    return MaterialApp(
      title: 'Flutter Demo',
      theme: ThemeData(
        primarySwatch: Colors.blue,
      ),
      home: const MyHomePage(title: 'Flutter Layout Builder Widget Example'),
    );
  }
}

class MyHomePage extends StatefulWidget {
  const MyHomePage({Key? key, required this.title}) : super(key: key);
  final String title;
  @override
  State<MyHomePage> createState() => _MyHomePageState();
}

class _MyHomePageState extends State<MyHomePage> {
  @override
  Widget build(BuildContext context) {
    return Scaffold(
      appBar: AppBar(
        title: Text(widget.title),
      ),
      body: Container(
        height: MediaQuery.of(context).size.height * 0.5,
        width: MediaQuery.of(context).size.width,

        alignment: Alignment.center,

        child: LayoutBuilder(
          builder: (BuildContext ctx, BoxConstraints constraints) {
            if (constraints.maxWidth >= 480) {
              return Row(
                mainAxisAlignment: MainAxisAlignment.spaceBetween,
                children: <Widget>[
                  Container(
                    padding: const EdgeInsets.symmetric(horizontal: 8),
                    alignment: Alignment.center,
                    height: constraints.maxHeight * 0.5,
                    color: Colors.blueGrey,
                    child:const Text(
                      'Left Part of Screen',
                      style: TextStyle(
                        fontSize: 18,
                        fontWeight: FontWeight.bold,
                        color: Colors.white,
                      ),
                    ),
                  ),
                  Container(
                    padding: const EdgeInsets.symmetric(horizontal: 8),
                    alignment: Alignment.center,
                    height: constraints.maxHeight * 0.5,
                    color: Colors.blueAccent,
                    child: const Text(
                      'Right Part of Full Screen',
                      style: TextStyle(
                        fontSize: 18,
                        fontWeight: FontWeight.bold,
                        color: Colors.white,
                      ),
                    ),
                  ),
                ],
              );
              // If screen size is < 480
            } else {
              return Container(
                alignment: Alignment.center,
                height: constraints.maxHeight * 0.5,
                color: Colors.redAccent,
                child:const Text(
                  'Flutter Normal Screen',
                  style: TextStyle(
                    fontSize: 20,
                    fontWeight: FontWeight.bold,
                    color: Colors.white,
                  ),
                ),
              );
            }
          },
        ),
      ),
    );
  }
}
flutter layoutbuilder widget Output:

Conclusion
You’ve learned the basics of the LayoutBuilder widget and seen some examples of how to use it.
Now, I’d like to hear from you: Do you know how to use the flutter positioned attribute? Did you think it would be this easy?
Either way, let me know by leaving a quick comment below.
To know more about layoutbuilder, you can read article from flutter doc.


