

We’ll discuss the declarative approach for Flutter navigation and routing example used in Flutter 2.0 and the imperative approach used in Flutter 1.0 in this tutorial.
A well-liked toolkit for creating cross-platform applications is Flutter. It works with all popular operating systems, including Android, iOS, and the web.
Whatever the application, navigation is crucial. It offers a consistent abstraction over the navigation APIs made available by different platforms. The imperative and declarative navigation APIs that Flutter offers are two different types.
Table of Contents
Imperative navigation (Flutter 1.0)
The navigation method used in Flutter 1.0 was imperative.
Flutter navigation and routing are accomplished by popping widgets from the top of a stack of widgets that are stacked on top of one another.
People, who read this article also read: Flutter Liquid Swipe Animation
Flutter Navigator class
All the navigation features in a Flutter app are provided by the Navigator class.
Navigator offers tools for changing the stack by pushing to it or popping from it. To navigate to a fresher page, use the Navigator.push method, and to return from the current page, use the Navigator.pop method.
A simple flutter navigation and routing example of pop and push is as follows: BuildContext and a PageBuilder are the first and second arguments, respectively, for the push method. This example makes use of MaterialPageRoute, which offers the transition animation and manages route changes:
import 'package:flutter/material.dart';

void main() {
  runApp(MaterialApp(
    title: 'My App',
    home: Main(),
  ));
}

class Main extends StatelessWidget {
  @override
  Widget build(BuildContext context) {
    return Scaffold(
      appBar: AppBar(
        title: Text('Main Route'),
      ),
      body: Center(
        child:RaisedButton(
          child: Text('Open route'),
          onPressed: () {
// pushing SecondRoute
            Navigator.push(
              context,
              MaterialPageRoute(builder: (context) => SecondRoute()),
            );
          },
        ),
      ),
    );
  }
}
Only BuildContext is required by the pop method, which also modifies the current route.
class SecondRoute extends StatelessWidget {
  @override
  Widget build(BuildContext context) {
    return Scaffold(
      appBar: AppBar(
        title: Text("Second Route"),
      ),
      body: Center(
        child: RaisedButton(
          onPressed: () {
// Removing SecondRoute
            Navigator.pop(context);
          },
          child: Text('Go back!'),
        ),
      ),
    );
  }
}
Additional methods offered by Navigator, such as *pushReplacement*, make arguments in a manner akin to push. Navigation back to the previous route will not be possible because it will replace the current one.
For instance, you might want to use *pushReplacement* to stop the user from returning to the login screen after a successful login.
Named routes
Named Routes let you change the path by using strings rather than providing component classes, allowing you to reuse code in the process.
The definition of a named route on MaterialApp is a map. You can use these routes from anywhere in the application.
Defining routes
The route is a map with string values for builders when it is passed to a MaterialApp’s routes property.
void main() {
  runApp(MaterialApp(
    title: 'My App',
    home: Main(),
// Routes defined here
    routes: {
      "second":(context)=>SecondRoute()
    },
  ));
}
Using named routes
To switch to a new route, pushNamed is used rather than push. Similarly, pushReplacement is replaced with *pushReplacementNamed*. All routes use the same pop technique.
class Main extends StatelessWidget {
  @override
  Widget build(BuildContext context) {
    return Scaffold(
      appBar: AppBar(
        title: Text('Main Route'),
      ),
      body: Center(
        child:RaisedButton(
          child: Text('Open route'),
          onPressed: () {
            Navigator.pushReplacementNamed(context, "second");
          },
        ),
      ),
    );
  }
}
Declarative navigation (Flutter 2.0)
Because Flutter 2.0 supports a declarative approach, the navigation has been improved. Due to the fact that pages change when states change, routing is now dependent on the state.
Improved web navigation support is another feature of Flutter 2.0.
The Flutter team publicly shared the following diagram to announce Flutter Navigation 2.0 and Router, which does a great job of illustrating the flow:
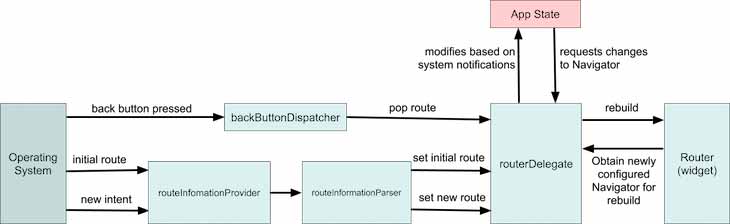
Flutter Navigator
Navigator shows the final page from a list of pages. By adding or deleting pages from the list’s end, you can alter the pages of the document.
The following example shows how to use the Navigator class with the updated Flutter Navigation and routing example by using page-based navigation.
This class controls the state of the page called _page. The setState call modifies this _page for navigation purposes:
class _App extends State {
// Creating state for pages
  List<Page> _pages=[];
The Navigator class receives the _page as a parameter. In accordance with the value of _page, Navigator will modify the current page.
When OS-based navigation is used, such as on Android by pressing the back button, onPopPage is called.
@override
  Widget build(BuildContext context) {
    return MaterialApp(
      home: Navigator(
        onPopPage: (route,result){
// check if route removed
          if(route.didPop(result)){
// remove the last page
            _pages.removeLast();
            return true;
          }
          return false;
        },
        pages: _pages,
      ),
    );
  }
}
By including a page in the initState lifecycle method, the first page can be set:
 @override
  void initState() {
    super.initState();
// setting intial page
    _pages=[_buildMain()];
  }
Using the MaterialPage widget, you can create a new material page. A child and a key are required by MaterialPage. The Navigator uses the key to differentiate between pages and detect page changes.
A new page is added to the _page state upon clicking the button. The widget is rebuilt when setState is called, and the navigator automatically takes care of the page change.
// This function creates a Page using MaterialPage
Page _buildMain(){
    return MaterialPage(child: Scaffold(
      body: Center(
        child: ElevatedButton(
          child: Text("click"),
          onPressed: (){
// When clicked add a new Page to _page list
            _pages.add(_buildSecondPage());
// call setState to trigger rebuild for Widget
            setState(() {
// create a copy of array
              _pages=_pages.toList();
            });
          },
        ),
      ),
// This helps Navigator to distigush between different pages
    ),key: ValueKey("home"));
  }
Similar to _buildMain, this page is created, but instead of adding a new page, it removes an existing one and initiates a rebuild.
// This function perform same task as _buildMain
Page _buildSecondPage(){
    return MaterialPage(child: Scaffold(
      body: Center(
        child: ElevatedButton(
          child: Text("back"),
          onPressed: (){
// This will take back to main
// remove the last page
            _pages.removeLast();
// call setState to trigger a rebuild
            setState(() {
// creating a copy of list
              _pages=_pages.toList();
            });
          },
        ),
      ),
    ),key: ValueKey("second"));
  }
The _pages list is only one of the states that can be used for navigation; other states are also available. Here’s one more flutter navigation and routing example:
class _App extends State {
  String _selected="main";

  Page _buildMain(){
    return MaterialPage(child: Scaffold(
      appBar: AppBar(),
      body: Center(
        child: ElevatedButton(
          child: Text("click"),
          onPressed: (){
            setState(() {
// add a new page
              _selected="second";
            });
          },
        ),
      ),
    ),key: ValueKey("home"));
  }

  Page _buildSecondPage(){
    return MaterialPage(child: Scaffold(
      appBar: AppBar(),
      body: Center(
        child: ElevatedButton(
          child: Text("back"),
          onPressed: (){
            setState(() {
// change back state to main
             _selected="main";
            });
          },
        ),
      ),
    ),key: ValueKey("second"));
  }

  @override
  Widget build(BuildContext context) {
    return MaterialApp(
      home: Navigator(
        onPopPage: (route,result){
          if(route.didPop(result)){
            _selected="main";
            return true;
          }
          return false;
        },
        pages: [
           _buildMain(),
// only show select if state has second selected
          if (_selected=="second") _buildSecondPage()
        ],
      ),
    );
  }
}
Using RouterDelegate
A fundamental widget used by a Router is RouterDelegate. It reacts to the engine’s route push and route pop intentions. In order to have more control over navigation, new navigation allows for the creation of RouterDelegate.
People, who read this article also read: Flutter SDK Installation on Windows, macOS, Linux
By adding PopNavigatorRouterDelegateMixin and ChangeNotifier mixins to the RouterDelegateAppRouteState> class, a RouterDelegate is produced.
The current path is followed by _selected. This is comparable to the state that was used in the first flutter navigation and routing example.
class AppRouter extends RouterDelegate<AppRouteState> with PopNavigatorRouterDelegateMixin,ChangeNotifier {
  String _selected="main";
The router uses this to update the URL in the address bar and to obtain the most recent router status.
// get correct state of router
@override
  AppRouteState get currentConfiguration => AppRouteState(_selected);
In order to support older navigation, the navigation key is used.
// This for older navigation support.
 final _navigation= GlobalKey<NavigatorState>();
  @override
  GlobalKey<NavigatorState> get navigatorKey => _navigation;
To start a rebuild, notifyListeners is used instead of setState. To alter the route, _selected is changed.
  Page _buildMain(){
    return MaterialPage(child: Scaffold(
      appBar: AppBar(),
      body: Center(
        child: ElevatedButton(
          child: Text("click"),
          onPressed: (){
            _selected="second";
// notify route changes
           notifyListeners();
          },
        ),
      ),
    ),key: ValueKey("home"));
  }
_buildMain and this are comparable
  Page _buildSecondPage(){
    return MaterialPage(child: Scaffold(
      appBar: AppBar(),
      body: Center(
        child: ElevatedButton(
          child: Text("back"),
          onPressed: (){
              _selected="main";
// notify route changes
          notifyListeners();
          },
        ),
      ),
    ),key: ValueKey("second"));
  }
In order to lay out other pages, the build function returns the Navigator widget. Building off of the previous function, this function is comparable. Rebuild is started using notifyListeners rather than setState
 @override
  Widget build(BuildContext context) {
    return MaterialApp(
      home: Navigator(
        key: _navigation,
        onPopPage: (route,result){
          if(!route.didPop(result)){
            return false;
          }
          _selected="main";
// notify route changes
          notifyListeners();
          return true;

        },
        pages: [
          _buildMain(),
// if Route is second show SecondPage
          if (_selected=="second") _buildSecondPage()
        ],
      ),
    );
  }
To alter the route, this function makes use of data passed by the router. When the engine passes the route push or pop intent, this function is called to modify the route. A different class, which we’ll discuss later, parses the data passed here.
  @override
  Future<void> setNewRoutePath(configuration) async {
// update page based on
    _selected=configuration.selected;
  }
}
RouteInformationParser
The configuration is received by setNewRoutePath from the router. RouteInformationParser examines this configuration for syntax.
A class should extend RouteInformationParser to represent the parsing state passed by the OS, engine, etc. The return value from currentConfiguration is transformed into RouteInformation by restoreRouteInformation.
The router state is provided to setNewRoutePath by parseRouteInformation as input.
class AppRouteInformationParser extends RouteInformationParser<AppRouteState>{
  // This converts route state to route information.
  @override
  RouteInformation restoreRouteInformation(configuration) {
    if(configuration.selected=="main") {
      return RouteInformation(location:"/main");
    } else {
      return RouteInformation(location: "/second");
    }

  }

// This converts route info to router state
  @override
  Future<AppRouteState> parseRouteInformation(RouteInformation routeInformation)async{
    var url=Uri.parse(routeInformation.location);
    print(url.path);
    if (url.path == "/") return AppRouteState("main");
    return AppRouteState(url.path.replaceAll("/", ""));
  }

}
Putting it all together
Currently, MaterialApp has a constructor with a new name that implements a router that accepts the arguments Delegate and InformationParser.
class _App extends State {
  @override
  Widget build(BuildContext context) {
    return MaterialApp.router(routeInformationParser: AppRouteInformationParser(), routerDelegate: AppRouter());
  }
}
Conclusion
We showed you how to implement navigation in a Flutter app using both the imperative approach used in Flutter 1.0 and the new declarative navigation introduced with Flutter 2.0 in this tutorial on Flutter navigation and routing example.
Both types of navigation may be appropriate depending on the specifics of your Flutter project, but a silver bullet is not one of them. Always go with the strategy that best meets your requirements, even if that necessitates combining the two.
I suggest taking a look at the Fluro and Voyager packages to get acquainted with navigation in Flutter.


