

This article will shed light on how to add flutter row spacing between column.
For creating UI in the Flutter app, the Column and Row widgets are crucial. You might notice that there is no space added between the widgets as you develop your app and add Flutter row spacing between Column. However, if you want your app design to look better, you might want to add some distance between the kids. We’ll therefore see the top 4 approaches to add row spacing between Column with examples in this tutorial.
How to Increase the Spacing Between Widgets in Flutter
To add Flutter row spacing between column in the following ways:
- Using SizedBox
- Using Spacer
- Using Expanded
- Using MainAxisAlignment (Recommneded)
Any of these approaches can be used, depending on your needs.
Table of Contents
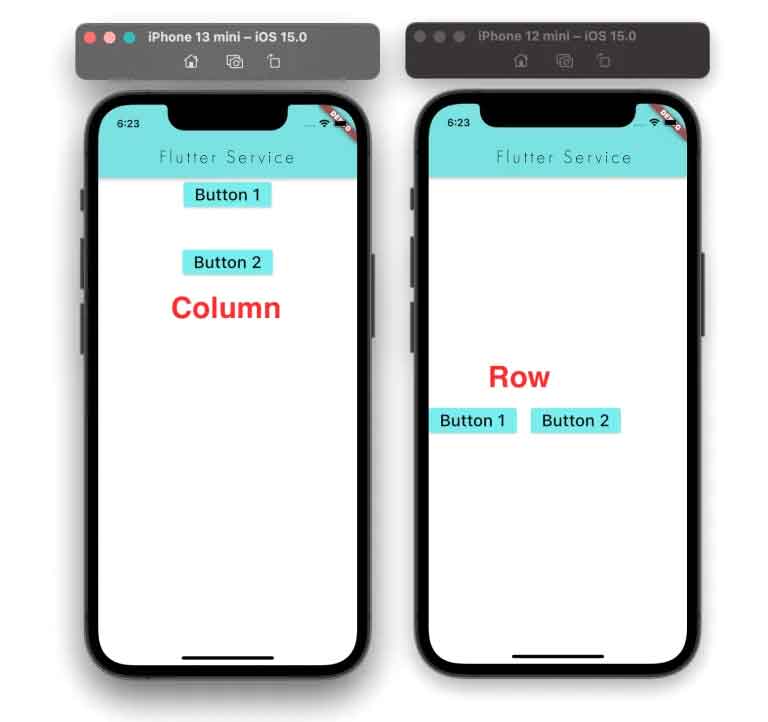
1. Using SizedBox To Add Flutter Row Spacing Between Column
You can designate the width and height of an empty box using the SizedBox widget. You must specify the height property when using the SizedBox widget in a Column, whereas you must specify the width property when using it in a Row widget.
Examples of codes
Column(
  children: [
    ElevatedButton(
      onPressed: () {},
      child: const Text(
        'Button 1',
        style: TextStyle(fontSize: 24),
      ),
    ),
    SizedBox(
      height: 50, // <-- SEE HERE
    ),
    ElevatedButton(
      onPressed: () {},
      child: const Text(
        'Button 2',
        style: TextStyle(fontSize: 24),
      ),
    ),
  ],
)
//-----
Row(
  children: [
    ElevatedButton(
      onPressed: () {},
      child: const Text(
        'Button 1',
        style: TextStyle(fontSize: 24),
      ),
    ),
    SizedBox(
      width: 20, //<-- SEE HERE
    ),
    ElevatedButton(
      onPressed: () {},
      child: const Text(
        'Button 2',
        style: TextStyle(fontSize: 24),
      ),
    ),
  ],
)
Output:
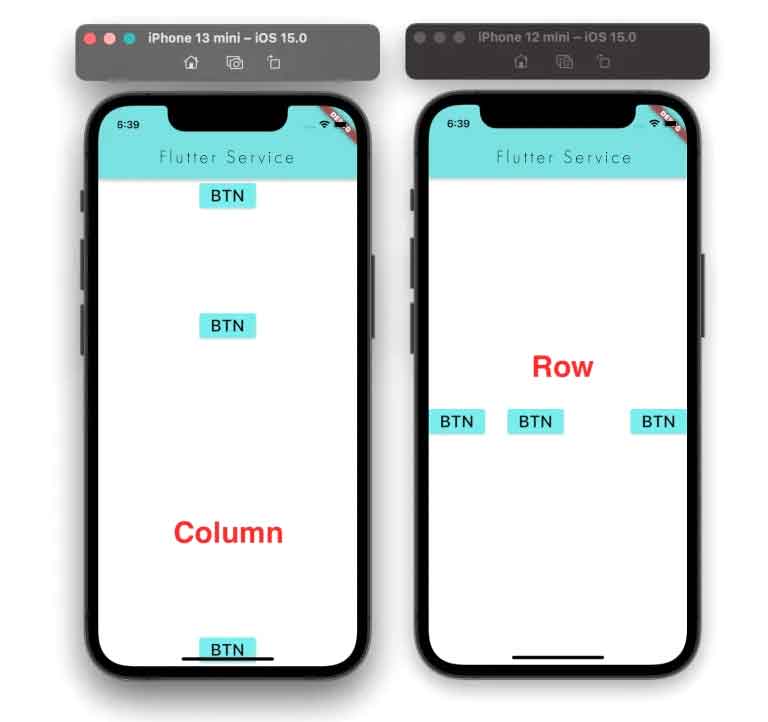
2. Using Spacer
The Spacer widget in Flutter allows you to add a blank space that you can modify to fit your design. By default, it takes all the available space and shifts the adjacent widget to the far side. You can manage the distance between widgets by adjusting the flex property of the Spacer widget.
Examples of codes
Column(
  children: [
    ElevatedButton(
      onPressed: () {},
      child: const Text(
        'BTN',
        style: TextStyle(fontSize: 24),
      ),
    ),
    Spacer(), // <-- SEE HERE
    ElevatedButton(
      onPressed: () {},
      child: const Text(
        'BTN',
        style: TextStyle(fontSize: 24),
      ),
    ),
    Spacer(
      flex: 2, // <-- SEE HERE
    ),
    ElevatedButton(
      onPressed: () {},
      child: const Text(
        'BTN',
        style: TextStyle(fontSize: 24),
      ),
    ),
  ],
),
//-----
Row(
  children: [
    ElevatedButton(
      onPressed: () {},
      child: const Text(
        'BTN',
        style: TextStyle(fontSize: 24),
      ),
    ),
    Spacer(), // <-- SEE HERE
    ElevatedButton(
      onPressed: () {},
      child: const Text(
        'BTN',
        style: TextStyle(fontSize: 24),
      ),
    ),
    Spacer(
      flex: 2, // <-- SEE HERE
    ),
    ElevatedButton(
      onPressed: () {},
      child: const Text(
        'BTN',
        style: TextStyle(fontSize: 24),
      ),
    ),
  ],
),
Output:

3. Using Expanded
Any child of a Column or Row that is wrapped inside an Expanded widget will take up the entire space in the main direction. For instance, placing an expanded widget in a column causes it to expand vertically, whereas placing one in a row causes it to fill the entire horizontal space. This is how it creates the empty space.
Examples of codes
Column(
  children: [
    ElevatedButton(
      onPressed: () {},
      child: const Text(
        'BTN',
        style: TextStyle(fontSize: 24),
      ),
    ),
    Expanded( // <-- SEE HERE
      child: SizedBox.shrink(),
    ),
    ElevatedButton(
      onPressed: () {},
      child: const Text(
        'BTN',
        style: TextStyle(fontSize: 24),
      ),
    ),
    Expanded( // <-- SEE HERE
      child: SizedBox.shrink(),
      flex: 3,
    ),
    ElevatedButton(
      onPressed: () {},
      child: const Text(
        'BTN',
        style: TextStyle(fontSize: 24),
      ),
    ),
  ],
)
//------
Row(
  children: [
    ElevatedButton(
      onPressed: () {},
      child: const Text(
        'BTN',
        style: TextStyle(fontSize: 24),
      ),
    ),
    Expanded( // <-- SEE HERE
      child: SizedBox.shrink(),
    ),
    ElevatedButton(
      onPressed: () {},
      child: const Text(
        'BTN',
        style: TextStyle(fontSize: 24),
      ),
    ),
    Expanded( // <-- SEE HERE
      child: SizedBox.shrink(),
      flex: 3,
    ),
    ElevatedButton(
      onPressed: () {},
      child: const Text(
        'BTN',
        style: TextStyle(fontSize: 24),
      ),
    ),
  ],
)
Output:
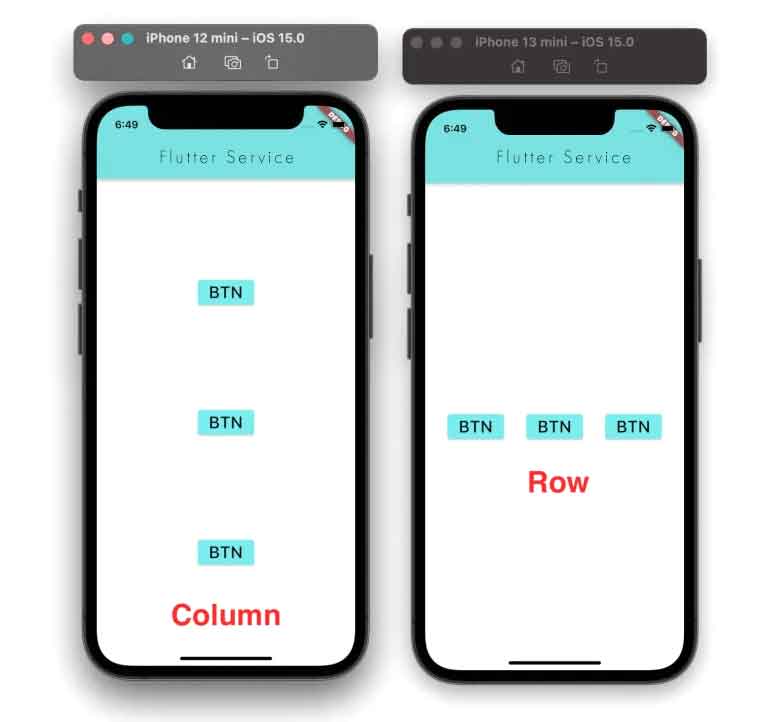
4. Using MainAxisAlignment (Recommended)
The predetermined space between the widgets can be added by using the MainAxisAlignment property of Column and Row. The MainAxisAlignment property eliminates the need for additional widgets to be placed in between the widgets.
The following list includes each MainAxisAlignment option:
enum MainAxisAlignment {
  /// Place the children as close to the start of the main axis as possible.
  start,
  /// Place the children as close to the end of the main axis as possible.
  end,
  /// Place the children as close to the middle of the main axis as possible.
  center,
  /// Place the free space evenly between the children.
  spaceBetween,
  /// Place the free space evenly between the children as well as half of that
  /// space before and after the first and last child.
  spaceAround,
  /// Place the free space evenly between the children as well as before and
  /// after the first and last child.
  spaceEvenly,
}
Examples of codes
Column(
  mainAxisAlignment: MainAxisAlignment.spaceEvenly, // <-- SEE HERE
  children: [
    ElevatedButton(
      onPressed: () {},
      child: const Text(
        'BTN',
        style: TextStyle(fontSize: 24),
      ),
    ),
    ElevatedButton(
      onPressed: () {},
      child: const Text(
        'BTN',
        style: TextStyle(fontSize: 24),
      ),
    ),
    ElevatedButton(
      onPressed: () {},
      child: const Text(
        'BTN',
        style: TextStyle(fontSize: 24),
      ),
    ),
  ],
)
//----
Row(
  mainAxisAlignment: MainAxisAlignment.spaceEvenly, // <-- SEE HERE
  children: [
    ElevatedButton(
      onPressed: () {},
      child: const Text(
        'BTN',
        style: TextStyle(fontSize: 24),
      ),
    ),
    ElevatedButton(
      onPressed: () {},
      child: const Text(
        'BTN',
        style: TextStyle(fontSize: 24),
      ),
    ),
    ElevatedButton(
      onPressed: () {},
      child: const Text(
        'BTN',
        style: TextStyle(fontSize: 24),
      ),
    ),
  ],
)
Output:
Conclusion
With the help of useful examples, we learned how to add Flutter row spacing between column in this tutorial. The SizedBox, Spacer, and Expanded widgets were the first things we saw. These are the techniques you can use to insert the filler widget in between the children. Finally, we saw how to add space between widgets in Flutter using the suggested method, which makes use of the MainAxisAlignment option.
Check out some more engaging Flutter tutorials, if you’d like.


