In this article, we will explore how to change the text color in flutter / Flutter Change Color of Text in an application. We know that Text widget is a basic text display component that allows developers to display a short piece of text on the screen. It can be used to display a single line of text or multiple lines of text, and it can be styled using a variety of properties such as color, font size, font weight, and more.
The output will look like this:


Table of Contents
Flutter Change Color of Text Locally
The process of Flutter Change Color of Text is relatively simple and can be achieved through the use of the TextStyle class and its color property.
Steps:
- Find out the file where you need to place the text widget.
- Inside the Text Widget, add a style parameter and assign this to the TextStyle widget.
- Add the color parameter inside the TextStyle widget.
- Now set the color what you want. For example, color: Colors.red
This is how you can change the text color only locally or at the page level.
Example Code of Flutter Change Color of Text
Text(
  "Hello World!",
  style: TextStyle(color: Colors.red),
),
Please note that the above example change the text color to red. You can choose any color that you want.
You can also use Hex color code, RGB color code and more to set the text color.
Text(
  "Hello World!",
  style: TextStyle(color: Color(0xff0000ff)),
),
The above example sets the text color to blue using the hex color code.
Changing text color globally using ThemeData
Sometimes we might be looking to have a common style for the whole pages of your app. There are several advantages to changing the text color globally in a Flutter app:
- Consistency: Changing the text color globally ensures that all text in the app has the same color, which can create a more cohesive and visually pleasing user interface.
- Easier maintenance: When the text color is set globally, it is easier to make changes to the text color throughout the app. If the text color is set for each individual text widget, it can be time-consuming and error-prone to make changes.
- Better accessibility: Setting the text color globally can make it easier to ensure that text is legible for users with visual impairments.
- Reusability: When the text color is set globally, it can be easily reused in other parts of the app, which can be useful when creating a new page or component.
- Flexibility: Changing the text color globally can be useful when creating different themes for your app, as it allows you to quickly and easily change the text color for the entire app.
- Performance: Changing the text color globally is faster than updating the color for each individual text widget, as it requires fewer rebuilds and less computation.
By using the global text color, it will be easy to change the text color throughout the app and ensure consistency in the design and accessibility as well as it will be easy to maintain the code.
Steps
- First, locate the MaterialApp Widget.
- Now add the theme parameter with ThemeData class assigned inside the MaterialApp.
- Add the textTheme parameter and assign the TextTheme with appropriate TextStyle like headline1, headline2
- Mention the color inside the TextStyle widget.
return MaterialApp(
      title: 'Flutter Demo',
      theme: ThemeData(
        textTheme: TextTheme(
          headline2: TextStyle(color: Colors.red),
          bodyText1: TextStyle(color: Colors.blue),
        ),
      ),
      home: const MyHomePage(title: 'Flutter Service'),
    );
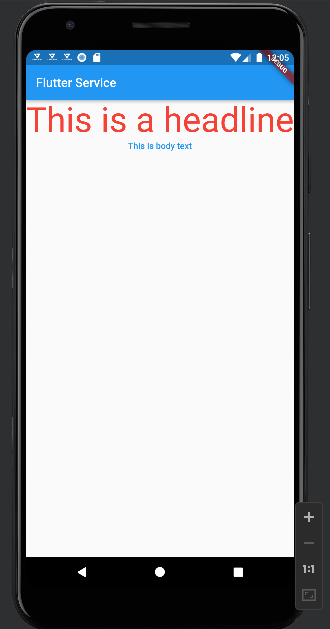
Now we have to assign the code on style
body: Column(
        children: [
          Text('This is a headline',
              style: Theme.of(context).textTheme.headline2),
          Text('This is body text',
              style: Theme.of(context).textTheme.bodyText1),
        ],
      ),
Full Code
import 'package:flutter/material.dart';

void main() {
  runApp(const MyApp());
}

class MyApp extends StatelessWidget {
  const MyApp({super.key});

  @override
  Widget build(BuildContext context) {
    return MaterialApp(
      title: 'Flutter Demo',
      theme: ThemeData(
        textTheme: TextTheme(
          headline2: TextStyle(color: Colors.red),
          bodyText1: TextStyle(color: Colors.blue),
        ),
      ),
      home: const MyHomePage(title: 'Flutter Service'),
    );
  }
}

class MyHomePage extends StatefulWidget {
  const MyHomePage({super.key, required this.title});

  final String title;

  @override
  State<MyHomePage> createState() => _MyHomePageState();
}

class _MyHomePageState extends State<MyHomePage> {
  @override
  Widget build(BuildContext context) {
    return Scaffold(
      appBar: AppBar(title: Text("Flutter Service")),
      body: Column(
        children: [
          Text('This is a headline',
              style: Theme.of(context).textTheme.headline2),
          Text('This is body text',
              style: Theme.of(context).textTheme.bodyText1),
        ],
      ),
    );
  }
}
Output


Different Ways To add the Colors in Flutter
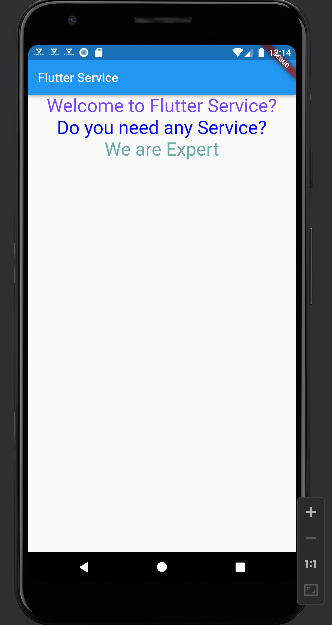
Three ways you can add color to the Text Widget and Flutter Change Color of Text.
- Colors.blue: This only used to define from predefined colors.
- Color(0xff0000ff): This is only use as custom color.
- Color.fromARGB(200, 66, 150, 145): This is only use to get color from alpha, red, green and blue color combination.
Code Example
Text(
              'Welcome to Flutter Service?',
              style: TextStyle(fontSize: 30, color: Colors.deepPurpleAccent),
            ),
            Text(
              'Do you need any Service?',
              style: TextStyle(fontSize: 30, color: Color(0xff0000ff)),
            ),
            Text(
              'We are Expert',
              style: TextStyle(
                  fontSize: 30, color: Color.fromARGB(200, 66, 150, 145)),
            ),
Output


Conclusion
In summary, this Flutter Change Color of Text article explained how to change text color in a Flutter app. Changing the text color can be done by setting the style property of the Text widget directly or by using the textTheme property in the ThemeData object. Changing text color globally has several benefits, such as consistency in design, easy maintenance, better accessibility, and flexibility. It is a good practice for making the app design consistent and easy to maintain. This article provided a clear understanding of how to change text color in Flutter and how it can be implemented in an app.
Read More:
How to Override / Disable Back Button in Flutter
References: Flutter documentation


